
Yes, a retrofit intercom system is almost always possible, even in a prewar walk-up with wiring nobody has touched since the 1960s. Buildings typically fit one of three paths: reusing existing 2-wire cabling, upgrading to IP/PoE for the best long-term performance, or installing a cellular/LTE panel that skips wiring entirely. The right call depends on what’s already in your walls, so the next move is a site survey to confirm wiring condition, power availability, and door lock compatibility before anyone quotes a price.
TL;DR:
- Most legacy wiring, including 2-wire and coax, can support modern retrofit intercom systems with a proper site survey confirming continuity and voltage.
- Buildings with existing structured cabling and recent renovations are best suited for IP/PoE upgrades, offering higher video quality and future-proof smart home integration.
- Cellular panels are ideal for locations where running new wiring is impractical but require recurring data fees and depend on cellular signal strength.
- Cost estimates range from low thousands for single entrances to tens of thousands for larger projects, with timelines from one day to several weeks depending on complexity.
- Proper preparation, including wiring condition, power sources, door hardware, and tenant coordination, significantly reduces the risk of project delays and scope creep.
Table of Contents
- What Is a Retrofit Intercom System?
- Which Retrofit Approach Fits Your Building?
- Pre-Install Checklist and Retrofit Readiness
- Step-by-Step Installation and Commissioning
- Retrofit Costs and Realistic Timelines
- Common Legacy Wiring Types and How to Test Them
- Maintenance and Troubleshooting After Retrofit
- What to Do With the Old Wired Intercom
- Retrofitting vs. Full Rewire: Why It Usually Wins
- Security Considerations for Retrofit Systems
- Compatibility With Building Infrastructure and Smart Home Systems
- Popular Retrofit Intercom Brands and What They’re Known For
- Get a Retrofit Site Survey From a Licensed NYC Installer
- Sources
- FAQ
What Is a Retrofit Intercom System?
A retrofit intercom system replaces an aging entry panel and its indoor stations while reusing as much of the building’s existing wiring and infrastructure as possible, rather than tearing out walls to run new cable. Instead of a full rewire, an installer swaps the outdated hardware for a modern panel that talks to residents’ smartphones, adds video, or connects to cloud-based access control, all while running through the same conduit that has been there for decades.
This matters because a full rewire in an occupied building means opening walls, coordinating with every tenant, and absorbing weeks of downtime. A retrofit sidesteps most of that. Industry guides describe retrofit upgrades as commonly reusing existing wiring to add mobile and video calling along with cloud management without a ground-up rewiring project. For property managers juggling tenant relations, lease terms, and a budget that never stretches as far as hoped, that distinction is the whole reason retrofits exist.
Which Retrofit Approach Fits Your Building?
Not every building should take the same route, and the wrong choice here is the single most common source of change orders mid-project.
2-wire reuse works by carrying power, audio, video, and data over the same two-conductor cable already running to your buzzer boxes. Because 2-wire retrofit solutions transmit power, audio and video, and data over existing two-wire infrastructure, they’re the lowest-disruption option for older apartment buildings with intact copper. The tradeoff is video quality and third-party integrations. A 2-wire system generally won’t match the resolution or app ecosystem of a full IP setup, and adding access control or camera integration later can require a protocol gateway.
IP/PoE upgrades deliver the best video quality, the most flexible smart home and access control integrations, and the clearest upgrade path for the next decade. They need at least one Ethernet drop to the entry panel, ideally landing on a network switch that can supply Power over Ethernet. If your building already has structured cabling from a past project, this is often the smartest long-term investment even though the upfront network work costs more than reusing legacy wire.
Cellular/LTE panels skip wiring altogether, using a cell data connection instead of a landline or network drop. That makes them attractive for standalone buildings, gate entries, or additions where running new cable is impractical. The catch is a recurring data fee and a dependency on cell signal strength, which can be inconsistent in below-grade entries or heavily shielded lobbies.
Here’s how that breaks down by building type:
- Prewar walk-ups with original wiring intact: 2-wire reuse, assuming continuity tests pass.
- Mid-size buildings with existing structured cabling or a recent renovation: IP/PoE upgrade.
- Detached entries, gates, or outbuildings with no easy cable path: Cellular/LTE panel.
- Buildings planning access control or camera integration soon: IP/PoE, even at higher upfront cost.
Pro Tip: Don’t assume your wiring is dead just because the intercom stopped working. A surprising number of “failed” systems are actually failed panels on perfectly good copper. A five-minute continuity test during the site survey can save you from paying for a rewire you don’t need.
Pre-Install Checklist and Retrofit Readiness
Getting an accurate quote instead of a padded one starts with what you hand the installer before they show up. A rushed site survey is the number one reason retrofit budgets balloon mid-project.
- Identify the cabling type and its condition. Photograph the wire gauge and insulation at the panel and at a few indoor stations, then test continuity with a multimeter if you have one on hand.
- Confirm your power source. Note whether you have a spare PoE switch port, an existing local transformer, or need a dedicated power supply run to the new panel.
- Check door hardware compatibility. Document whether the current setup uses an electric strike or a magnetic lock, and photograph the relay wiring at the door controller; this can help with door hardware and strike plate repairs or replacement if needed during the retrofit.
- Measure the mounting backbox and check weatherproofing. Entry panels come in different depths and cutout sizes; a mismatch here is a common source of last-minute part swaps.
- Line up tenant coordination and building approvals early. Notify residents about access disruptions and confirm whether your building’s management company or co-op board requires sign-off before work begins.
A pre-install checklist covering cabling, power, mounting, and local code is what separates a same-day retrofit from a project that drags into a second visit. Contractor field experience backs this up directly: degraded wiring and incompatible door hardware are the most common causes of mid-project scope increases, which means the fifteen minutes spent photographing your backbox now is cheaper than the change order later.
Step-by-Step Installation and Commissioning
A professional retrofit installation follows a fairly consistent sequence, whether it’s a single townhouse entry or a 40-unit building lobby.
- Label and document every wire before disconnecting anything. This single step prevents the most common commissioning delay: guessing which conductor did what on the old system.
- Remove the old unit and test the exposed wiring for continuity, measuring voltage and signal quality to confirm the cable run is still viable.
- Mount the new backbox or adapter plate, then connect power (PoE, an injector, or a voltage converter depending on the approach) and the door release wiring.
- Provision the panel on the SIP network or cloud platform, set up resident accounts, and assign unit codes.
- Test the door release repeatedly under real conditions, including from a resident’s phone if the system supports remote unlock.
- Hand over documentation: wiring diagrams, resident setup instructions, and warranty paperwork.
Manufacturer guides describe this as roughly a nine-step sequence from site survey through handover built specifically to reduce commissioning errors. Skipping the labeling step is the single most avoidable mistake we see, because re-tracing unmarked wire after removal turns a two-hour job into a half-day one.
Retrofit Costs and Realistic Timelines
Budget ranges vary widely based on building size, and any contractor who quotes a flat number without seeing your wiring first is guessing. Published planning estimates suggest small single-entrance retrofits often start in the low thousands of dollars, while larger multi-unit projects scale into the tens of thousands depending on unit count and installation complexity.
Several factors move that number up or down:
- Number of indoor monitors or app-based endpoints you’re provisioning per unit.
- Wiring surprises discovered once the old panel comes off the wall.
- Door hardware upgrades, particularly if you’re moving from a basic strike to something with better fail-safe behavior. Even a modest investment in reliable door strike hardware pays off in fewer service calls.
- Permitting requirements, which vary by borough and by whether the work touches fire egress hardware.
Timelines follow the same logic. A single entrance with intact wiring can often be completed in one to three days. A building-wide retrofit across dozens of units, especially one requiring coordination with a management company and tenant notices, can stretch into a multi-week project. For buildings older than 30 years, budgeting a contingency above the initial quote is a reasonable planning buffer, since legacy wiring rarely behaves exactly as expected once the wall plate comes off.
Common Legacy Wiring Types and How to Test Them
Knowing what’s behind your buzzer panel changes everything about which retrofit path makes sense.
- 2-wire systems carry power and signal over a single twisted pair, common in older apartment buildings and townhouses built before video intercoms were standard.
- 3, 4, and 5-wire systems add separate conductors for audio, door release, and sometimes power, typically found in mid-century buildings with audio-only intercoms.
- Coax cabling shows up in buildings that had analog video intercoms installed, and it can sometimes be repurposed for IP video with the right converter.
- Cat5/Cat6 structured cabling is the ideal foundation for an IP/PoE retrofit and is increasingly common in buildings renovated in the last 15 years.
A basic continuity test with a multimeter, checking for resistance across the run rather than an open circuit, tells you quickly whether a wire is worth reusing. Voltage readings that fall well below the panel’s rated output usually point to corrosion or a partial break somewhere in the run. Topology matters too: a daisy-chain wiring layout, where each unit connects to the next in sequence, limits your retrofit options compared to a star topology running back to a central point. When more than a few runs test as dead, minimal rewiring, usually just the failed segments rather than the whole building, is the practical fix.
Maintenance and Troubleshooting After Retrofit
A retrofit isn’t a “set it and forget it” upgrade. Routine checks keep it running and keep service calls rare.
- Review firmware updates and resident credentials on a regular schedule, since outdated firmware is a common source of connectivity glitches.
- Check your PoE power budget if you’ve added multiple devices to one switch, since overloaded ports cause intermittent dropouts that look like hardware failure but aren’t.
- Validate strike timing periodically, confirming the door releases and re-locks within the expected window.
When something does go wrong, a few quick checks solve most issues: power loss usually traces to a tripped breaker or failed injector, network drops often mean a loose Ethernet connection, and poor audio or video quality frequently points back to degraded legacy wiring rather than the new panel itself. Ask your installer for a maintenance plan that spells out warranty terms and response times in writing, not just verbally at handover.
Pro Tip: Keep a laminated card near your building’s network closet listing which unit connects to which port. It sounds simple, but it’s the single fastest troubleshooting shortcut when a tenant calls about a dead buzzer.
If something needs attention faster than a scheduled maintenance visit, same-day intercom troubleshooting and repair is worth having on speed dial before you actually need it.
What to Do With the Old Wired Intercom
Once the new panel goes in, the old hardware still needs somewhere to go, and the right answer depends on its condition. If the legacy unit still functions, some buildings keep it as a backup at a secondary entrance or hand it off during a building sale as spare equipment, though this is increasingly rare as parts become obsolete.
More commonly, the old panel gets recycled. Electronics recycling programs across New York City accept intercom hardware, and many electrical contractors will remove and dispose of the old unit as part of the installation contract rather than leaving it for the building super to deal with. Removal is straightforward once the new system is wired and tested: the installer disconnects the legacy panel, caps or repurposes any wiring not being reused, and patches the mounting location if the new hardware has a different footprint.
One thing worth flagging to your installer ahead of time: some older intercom panels, particularly those manufactured before the mid-1980s, may contain components that require special handling during disposal. A licensed contractor should know local disposal requirements without you having to ask, but it’s a fair question to raise during the site survey. Don’t let old wiring segments sit exposed in a wall cavity either. Even unused runs should be capped properly to avoid confusing the next contractor who opens that wall five years from now.
Retrofitting vs. Full Rewire: Why It Usually Wins
A full rewire makes sense in rare cases, mainly new construction or a gut renovation where walls are already open. For nearly everyone else, retrofitting delivers most of the same functional upgrade at a fraction of the disruption.
The disruption difference is the real story. A full rewire means opening walls throughout a building, coordinating with every tenant for access, and often displacing residents temporarily near heavy construction zones. A retrofit typically confines the work to the entry vestibule and a few access points, often completed within a day or two for a single entrance.
Cost follows the same pattern. Reusing existing cabling avoids the labor-intensive process of running new conduit through finished walls, which is usually the single largest line item in a full rewire quote. Integrators increasingly recommend a phased approach: retrofit the main entrance now, then plan in-unit upgrades later as budgets allow, rather than forcing an all-or-nothing decision.
The main scenario where a full rewire genuinely wins is when your existing cabling has failed extensively, or when you’re planning a level of integration, extensive access control, dozens of camera runs, building-wide structured cabling, that makes new infrastructure worth the disruption regardless. Even then, a partial rewire limited to the failed segments is usually more realistic than tearing out an entire building’s wiring.
Security Considerations for Retrofit Systems
Swapping an old buzzer panel for a smart one changes your building’s risk profile, not just its convenience level, and it’s worth thinking through both sides.
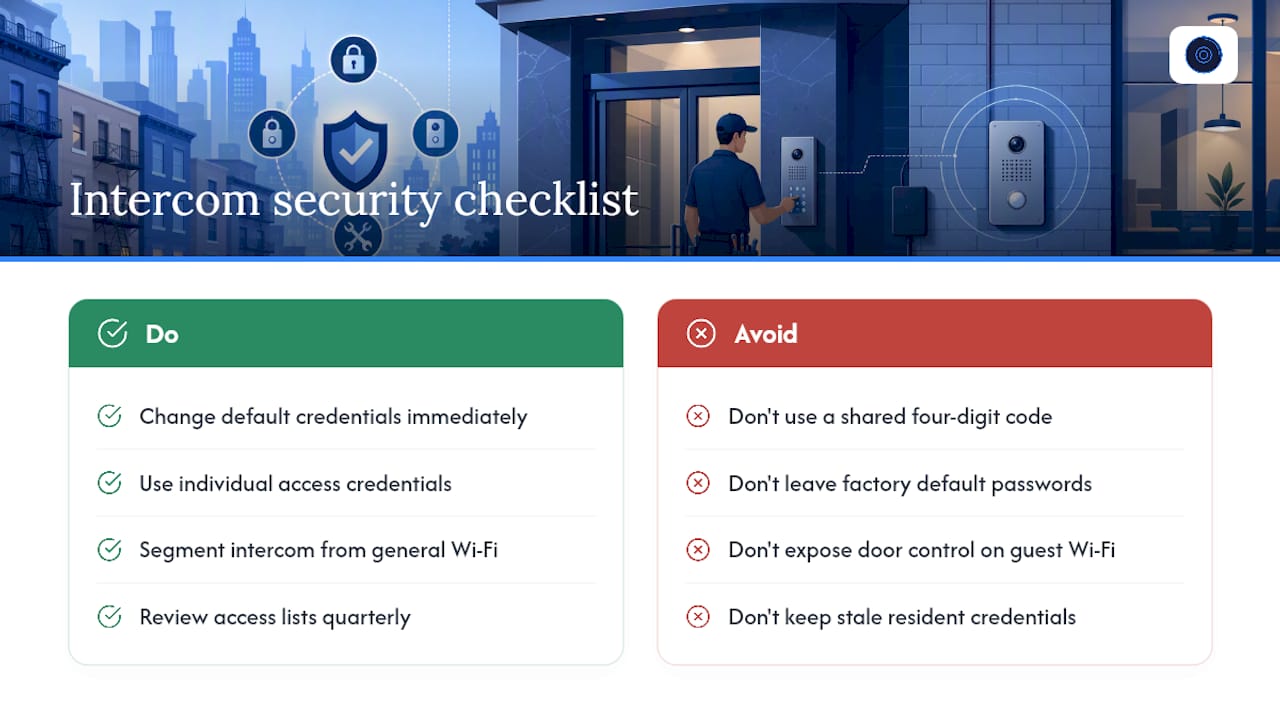
On the upside, modern retrofit panels typically support encrypted communication between the panel and resident apps, individual access credentials instead of a single shared code, and activity logs showing who buzzed in whom and when. That last point matters more than it sounds. A shared four-digit code that’s been the same since 2015 and texted to every new tenant’s cousin is a bigger security gap than most managers realize.
To actually enhance security rather than just modernize convenience, a few practices matter. Change default credentials on the panel immediately after installation, since factory-set passwords are publicly documented and are the first thing a bad actor tries. Segment the intercom’s network connection from general building Wi-Fi where possible, so a compromised guest network doesn’t expose door control. Review resident access lists quarterly, removing former tenants promptly rather than letting stale credentials pile up. And confirm your installer sets strike timing correctly. A door that stays unlocked too long after a valid buzz is a small oversight with outsized consequences.
If your building is also weighing broader access control upgrades alongside the intercom retrofit, it’s worth reviewing access control installation and repair options at the same time, since the two systems often share wiring and network infrastructure.
Compatibility With Building Infrastructure and Smart Home Systems
The best retrofit panel is only as good as what it can talk to. Before committing to a specific system, check how it integrates with what your building already has or plans to add.
For buildings with existing structured cabling, an IP-based retrofit panel typically integrates cleanly with network-based access control, security cameras, and building management platforms already running on that same backbone. This is where structured cabling and network wiring work pays off long after the initial intercom project, since a well-documented network closet makes every future upgrade faster and cheaper.
Smart home compatibility varies more than manufacturers like to admit. Many retrofit panels offer mobile app calling and remote unlock as standard features, but deeper integrations, tying the intercom into a broader smart building platform, syncing with keyless entry systems, or connecting to a video management system, depend heavily on whether the panel supports open protocols or locks you into a closed ecosystem. Ask specifically about SIP compatibility and whether the platform offers an API or third-party integration support before assuming your retrofit will play nicely with a system you’re planning to add next year.
For 2-wire retrofit installs, protocol gateways can bridge that legacy wiring to an IP-based system down the road, which matters if you’re retrofitting in phases rather than all at once. That flexibility is one of the more useful features of a 2-wire approach: staged upgrade strategies let a building start with basic functionality now and add integration later without ripping out the panel again.
Popular Retrofit Intercom Brands and What They’re Known For
The retrofit market has matured enough that most reputable manufacturers now build products specifically designed to work over legacy wiring rather than forcing a rip-and-replace approach.
Comelit, for example, is widely used across New York City apartment buildings for its range of 2-wire and IP retrofit panels that support video calling and integrate with mobile apps without requiring a full network overhaul in every case. Buildings with older Comelit or similar 2-wire infrastructure often find the upgrade path within that same product family to be the least disruptive option, since much of the existing wiring and mounting hardware carries over directly.
For buildings prioritizing a fully IP-based, cloud-managed system with strong smartphone integration and video quality, dedicated IP intercom platforms designed around PoE infrastructure tend to offer the most flexibility for future access control and camera integration. Cellular/LTE panel manufacturers, meanwhile, focus specifically on standalone or hard-to-wire locations where cell connectivity solves a problem no amount of cable fishing can.
Rather than picking a brand off a spec sheet, the more reliable approach is matching the panel family to your building’s existing wiring and infrastructure, then letting your installer recommend the specific model that fits, since compatibility with what’s already in your walls matters more than any single feature list.
Get a Retrofit Site Survey From a Licensed NYC Installer
Retrofitting an intercom system is a job that rewards experience because the difference between a smooth one-day install and a project that drags on for weeks usually comes down to how well the wiring and door hardware were assessed up front. YDA Security Systems NYC has handled retrofit and new installation projects across Manhattan, Brooklyn, Queens, and Staten Island, backed by licensed and insured technicians, a 1-year warranty on every installation, and a track record with more than 5,000 satisfied clients. That includes hands-on experience with Comelit intercom systems, one of the most common platforms found in retrofit projects across the city’s older apartment buildings.
A YDA site survey covers exactly what this guide has walked through: cabling type and condition, power source confirmation, door hardware compatibility, and mounting dimensions, so the quote you get reflects what’s actually in your walls rather than a generic estimate. Coming to the survey with photos of your existing panel, wiring, and door hardware speeds things up considerably.
If your building’s buzzer system is due for an upgrade, request an intercom installation quote and a technician will walk the property, confirm which retrofit approach fits, and give you a firm number before any work begins.
Sources
- Intercom replacement & retrofit: A complete guide | 2N
- 5 Things Contractors Wish They Knew Before Retrofitting Apartment Intercoms | DNAKE
FAQ
Can You Upgrade an Old Intercom System?
Yes. Most legacy intercom wiring, whether 2-wire, coax, or Cat5, can support a modern retrofit panel once continuity and voltage are confirmed during a site survey.
What Are Some Alternatives to a Full Intercom Replacement?
Besides a complete rewire, alternatives include 2-wire reuse for low-disruption upgrades, IP/PoE panels for buildings with structured cabling, and cellular/LTE panels for locations where running new wire isn’t practical.
How Much Does It Cost to Install an Intercom System in a House?
Costs vary based on wiring condition, door hardware, and the number of entry points, with small single-entrance projects typically landing in the low thousands of dollars. Current pricing for a specific property is available by requesting a quote through YDA Security Systems NYC’s intercom installation page.
How Can I Replace My Home Intercom System?
Start with a site survey to check your existing wiring, power source, and door hardware, then have a licensed installer remove the old unit, mount the new panel, and commission the door release and app connections before handover.
Do I Need to Rewire My Building for a Video Intercom?
Not necessarily. Many video intercom retrofits work over existing 2-wire or coax cabling, though buildings wanting the best video quality and smart home integration benefit most from at least one IP/PoE network connection at the entry panel.